Learn how to cut video and export it without quality loss from our below tutorial. You can do it in a few minutes without any video editing skill.
So, you have a footage, captured by your smartphone or an action camera and want to cut out some parts of it. This is the right tutorial for you. In just a few minutes download and install a free video editor, you can do much more than just cutting job. My suggestion is to use ActivePresenter because it is completely free. Here is the detail tutorial.
- Read our review about ActivePresenter here!
How to cut video and export without quality loss in ActivePresenter
Step 1: First of all, download and install ActivePresenter on your computer. Once you get the program, go to Blank project on the interface to create a new one. Then, import your footage into the editor.

Step 2: Import your footage to the editor from the annotation tab. Go to Anotation-> Video -> From File… and choose your video that you need to cut.

Step 3: Choose video object on the timeline, click on cutting point and choose Split video.

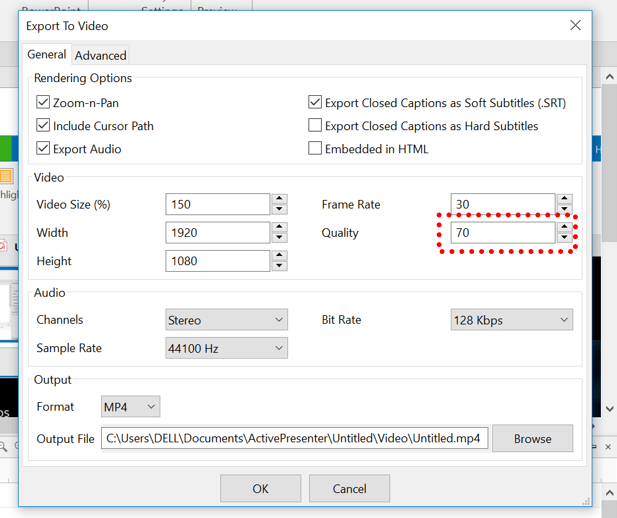
Now you know how to cut video, right? Choose another point and cut/ split again. In order to remove unwanted part of your video, just click on the video and press DELETE. Finally, you will have to export your video to finish the work. ActivePresenter is one of the most powerful program for video rendering. Remember to choose Quality in 70 or 80 to get smaller video size with the same quality.
Well, with ActivePresenter, you can do many other things with your video such as add text, shapes, apply blur effect or green screen and so on. You can also follow this YouTube tutorial to know how to cut video in ActivePresenter.
Bottom line
ActivePresenter is not the only option you can use to cut, trim or crop video for free. Other name like Lightworks, Filmora, Movavi or Shotcut can also do this job perfectly. However, I chose ActivePresenter to write a tutorial because it is 100% free and I like how it can render videos without quality loss rapidly. I hope the information is useful to you. Don’t forget to follow us to receive more valuable post notifications in the future.
Read also: Best video editors for Windows and Mac
Good luck!

Leave a comment