Being a teacher can be overwhelming. From grading papers and keeping up with classes, the last thing on your mind is learning something new. It’s one reason why it may be challenging to introduce video technology in the classroom. But if you find the right tool and know what to expect, you’ll be on your way to creating video content that your students will love.
Many educators who use video in the classroom say it helps save time and headaches. It also provides students the chance to learn at their own pace. Both of these reasons are why you should consider using video in the classroom.
Pick the right tool that does it all
There are numerous tools in the marketplace, and it can get overwhelming to learn something new. That’s why it’s important to choose the right tool. To start creating videos, try looking for a screen recorder that’s easy-to-use and intuitive. Not only is it easy, but it also has all the features needed to create engaging videos.
A screen recorder is essential for teachers looking to create video tutorials. A screen recording (or screencast) is a video of a computer screen, which works well for teachers looking to do a show-and-tell.
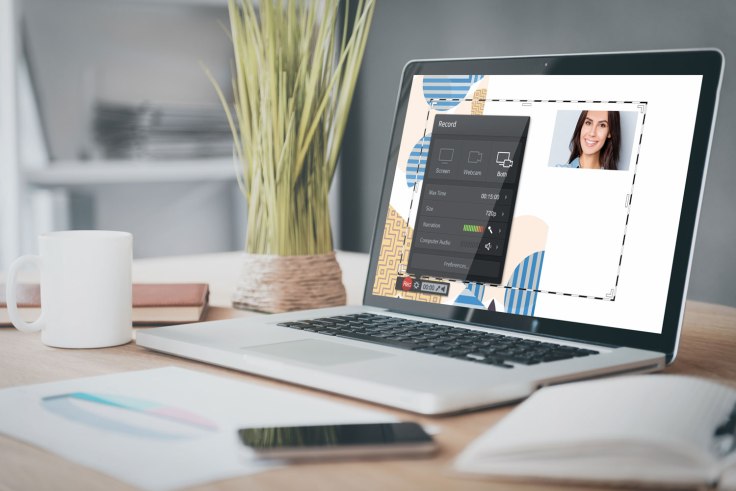
We recommend Screencast-O-Matic for its screen recording and video editing abilities. It comes with a free screen recorder. There’s no need to download and install any applications. Just head to the website, sign up and access the recorder with just a few easy clicks.

When you record with Screencast-O-Matic, you can adjust the size of your recording area by choosing from preset sizes, or you can easily drag and drop the frame to get it to your desired size. You also have the option to include your webcam or cursor in your recordings.
Choosing audio is also easy with Screencast-O-Matic. You can include computer audio, narration, and music to your videos.
Not only is it free to record your screen, but it’s also affordable when you upgrade to a subscription plan. At only $18 a year for a Deluxe plan, you get a complete video editor giving you the ability to add multimedia, transitions and also share your video to multiple social sharing websites.
Tips and tricks to create video tutorials
Creating videos doesn’t have to hard. It can be fun and easy! This is where teachers can get really creative with their work and add a bit of personality too. Now that we have a video tool let’s turn to easy tips and tricks to create videos for class.
1. Stay organized
Organization is the key to creating a successful video. Scripts or outlines are great ways to organize thoughts. Start with bullet points then elaborate with explanations. Once you get the outline done, you can begin piecing your script together. Screencast-O-Matic has made it easier for teachers to add scripts to their videos. You can type out a sentence, add narration and record video in sections by using their Scripted Recordings feature.
2. Prepare your recording
Before you hit record, there are several things you should do to make sure your screencast goes without a hitch.
- Put an end to notifications: Don’t get into a position where you are recording, and you start getting personal notifications popping up on your screen. This will show up as you record your video. Head into your settings and hide notifications before you start recording.
- Check your microphone: Place your microphone near your camera. Put it in the same spot as you record. The key is to have your mouth and the microphone the same distance throughout your recording. This will ensure that volume levels remain the same throughout your recording.
3. Record your video
Screencasts don’t have to be professional with fancy voiceover artists or high-end animated graphics. These are educational videos with a sole purpose of teaching your topic.
- Be yourself and talk conversationally: We know it can be intimidating talking to a camera, but the key to a successful video is to be yourself. Talk as if you are teaching in front of the classroom. Better yet, look at the camera and imagine speaking to a student.
- Use the pause button when you can: Keep the pause button ready. Hover your mouse over the pause button when you know you are transitioning to a different topic. You can pause, think about what you are going to say, prepare any notes you have, then hit record.
4.Polish and edit videos
Once you are done recording, you can edit out any mistakes and add overlays or multimedia to enhance your video. Doing this with Screencast-O-Matic video editor is easy.
- Watch your video and take notes: A great way to save time and headaches is to review your video from start to finish. Make notes on what to cut, emphasize or even highlight during your video. Taking notes will help you edit faster.
- Delete what you don’t need: Cut out any dead space or awkward pauses in the video. You can trim the beginning or end as well as cut sections in the middle of the video.
- Add images, overlays, or video: This is the time when you can let your creativity shine. Adding overlays will help you emphasize certain points of your video. You can add text, shapes or use an arrow to point to specific areas of your video. By adding images or videos, you can bring more context to your topic.
- Cover up mistakes: You can also cover up multiple mistakes by adding multimedia including slides over your recordings. You don’t have to re-record to get this done. All you need to do is import your media (video or pictures) and place it in your recording. You can also add a new recording into your video.
Bottom line
Your video doesn’t have to be perfect! No matter how many edits you make, the key to a great video is making sure students understand the subject matter. As long as the student is learning, your video is successful! So keep creating and don’t let perfection get in the way of teaching.
This article is sponsored by Screencast-O-Matic!

Leave a comment