Have you ever sat down to build an online course, opened your software, and stared blankly at a white screen? This is known as “blank canvas syndrome,” and it is the biggest productivity killer in instructional design.
Many developers make the mistake of jumping straight into development without a blueprint. The result? Disjointed content, endless revision cycles, and a final product that fails to engage learners. This is where a storyboard becomes your most valuable asset.
A well-crafted storyboard bridges the gap between a rough idea and a polished final course. It serves as the architectural blueprint for your project, ensuring that when you finally open your eLearning authoring tools, you know exactly what to build, how it should look, and how it should function.
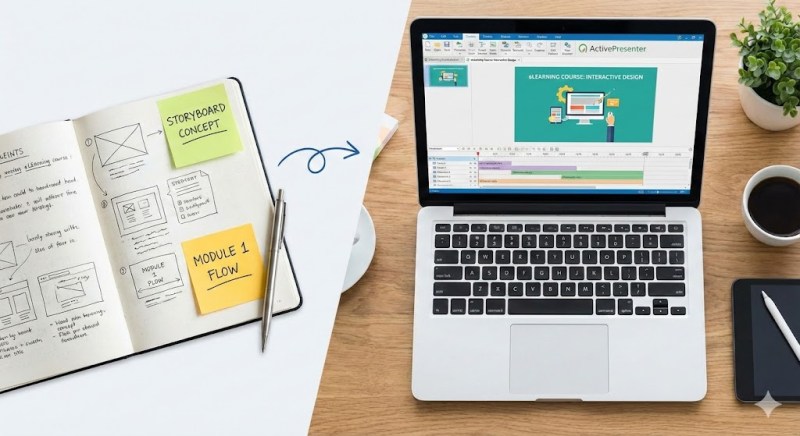
In this guide, we will walk you through the step-by-step process of creating an effective storyboard and explore how the right elearning authoring software can bring your vision to life effortlessly.
What is an eLearning Storyboard and Why Do You Need One?
At its core, an eLearning storyboard is a document that describes every element of your course—screen by screen. It outlines the text the learner will read, the audio narration they will hear, the visuals they will see, and the interactions they will perform.
Think of it like a movie script. A director wouldn’t start filming a blockbuster without a script and a shot list; similarly, you shouldn’t start building a course without a storyboard.

Key Benefits of Storyboarding
Before we dive into the “how-to,” it is crucial to understand the “why.”
- Stakeholder Alignment: It is much easier (and cheaper) to change a text description in a Word document than to re-program a complex interaction in your software. A storyboard allows you to get approval from clients or managers before development begins.
- Time & Cost Efficiency: With a clear plan, development becomes a production line task rather than a creative brainstorming session. This significantly reduces the time spent inside your authoring tool.
- Enhanced User Experience (UX): Storyboarding allows you to see the “big picture” of the learner’s journey, ensuring the flow is logical and the pacing is appropriate.
Step-by-Step Guide to Creating an Effective Storyboard
Creating a storyboard might feel like an extra step, but it is an investment that pays off during development. Here is a proven framework to get you started.
Step 1: Analyze Your Target Audience and Goals
Before writing a single word, you must define the foundation.
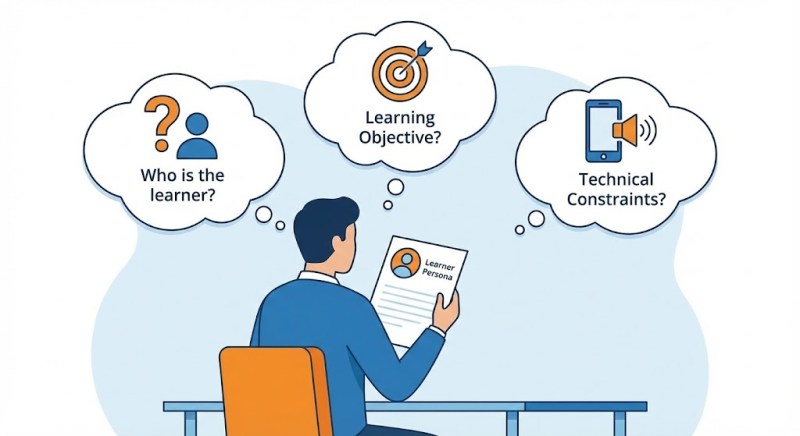
- Who is the learner? Are they tech-savvy new hires or experienced executives? This dictates the tone and complexity of your language.
- What is the Learning Objective? What should the learner be able to do after completing this slide or module?
- Technical Constraints: Will they access this on mobile? Do they have audio enabled?
Pro Tip: Create a “Learner Persona” card and keep it visible while you write. It keeps your content focused on their needs, not just on the information you want to dump.
Step 2: Gather and Organize Content
You likely have raw material scattered everywhere—PDF manuals, PowerPoint decks from Subject Matter Experts (SMEs), and policy documents.
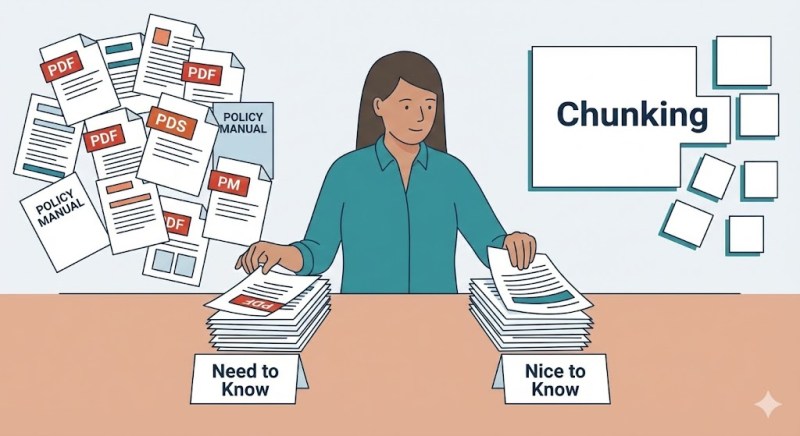
- Curate: Don’t use everything. Select only the “need to know” information. Move “nice to know” info into downloadable resources or appendices.
- Chunking: Break long paragraphs into bite-sized pieces. Modern learners have short attention spans; aim for one key concept per screen.
Step 3: Choose Your Storyboard Format
There is no “wrong” format, but different tools suit different projects:
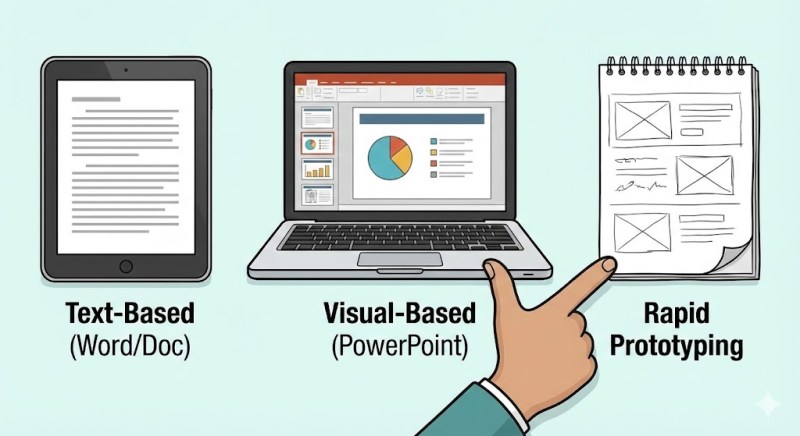
- Text-Based (Word/Google Docs): Best for linear courses with heavy narration. It focuses on the script and instructions.
- Visual-Based (PowerPoint): Best for visual learners and clients who need to “see” the layout. It mimics the slide-based nature of many eLearning authoring tools.
- Rapid Prototyping: Sketching directly on paper or using wireframing tools.
Step 4: Sequence and Flow
Arrange your “chunks” into a logical flow. A typical effective sequence looks like this:
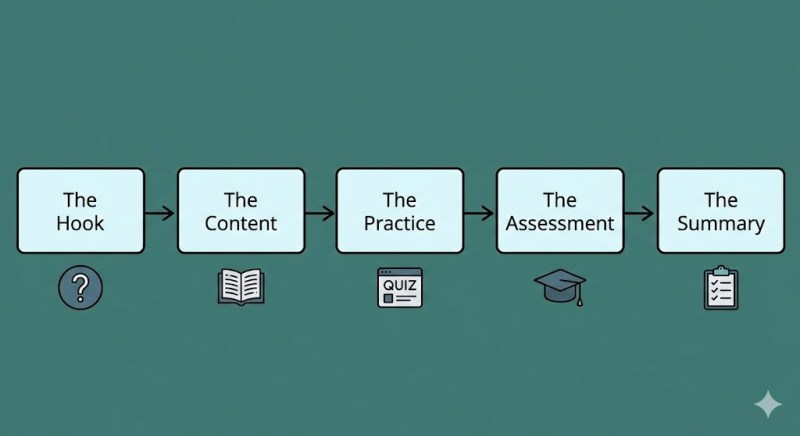
- The Hook: A scenario or question to grab attention.
- The Content: Presenting the new information.
- The Practice: Low-stakes knowledge checks or interactive scenarios.
- The Assessment: Final graded quiz.
- The Summary: Recap and next steps.
Step 5: Detailed Screen Design
Now, we get specific. For each screen in your storyboard, you should define four distinct elements:
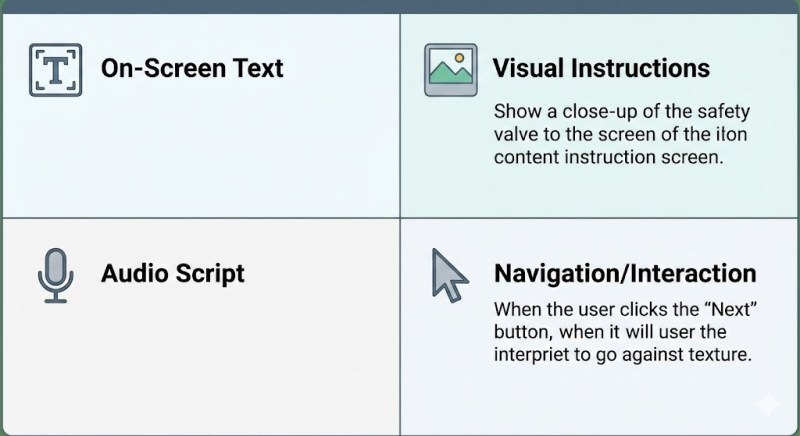
- On-Screen Text: The actual headings and bullet points the learner reads. Keep this minimal.
- Audio Script: The narration that accompanies the slide. This should be conversational, not just a robot reading the on-screen text.
- Visual Instructions: Describe images, icons, or videos. (e.g., “Show a close-up of the safety valve with a red arrow pointing to the release lever.”)
- Navigation/Interaction: Instructions for the developer. (e.g., “When the user clicks the ‘Next’ button, jump to Slide 4. If they answer incorrectly, show the ‘Try Again’ layer.”)
Moving from Concept to Creation: Choosing the Right Tools
Once your storyboard is approved, the magic happens: you transform that static document into a live, interactive experience. This is where your choice of software becomes critical.
The market is flooded with options, ranging from cloud-based apps to robust desktop software. Beginners often search for the best free elearning authoring tools to keep costs down. While free tools can be great for simple slide-flipping presentations, they often lack the advanced features needed to truly engage learners, such as branching scenarios, responsive design, or software simulations.
If you want to maintain professional quality without breaking the bank or facing a steep learning curve, you need a tool that balances power with usability. That’s when ActivePresenter comes in place!
Why ActivePresenter is the Solution for Your eLearning Designs
When you move from storyboarding to development, you want a tool that feels familiar but acts powerful. ActivePresenter stands out as a comprehensive solution that serves as both an eLearning authoring tool, a video editor, and a screen recorder, plus AI features.
Here is why ActivePresenter is the ideal partner to bring your storyboards to life:
1. Familiar Interface for Seamless Transition
If you chose PowerPoint for your storyboarding phase (as many pros do), ActivePresenter will feel like home. Its interface is designed with a familiar slide-based layout, meaning you don’t need to learn coding or a complex new workflow.
- Why it matters: You can often copy and paste elements from your PPT storyboard directly into ActivePresenter, or even import PowerPoint slides to convert them into interactive HTML5 courses instantly. This drastically reduces development time.
2. Advanced Interactivity Without Coding
A storyboard often contains notes like “If user clicks A, show popup B.” In many tools, this requires complex triggers or variables.
- The ActivePresenter Advantage: The “Events – Actions” system allows you to build complex logic easily. You can create branching scenarios, gamified learning content, and drag-and-drop interactions just by selecting options from a menu. It empowers you to build exactly what you wrote in your storyboard, without technical limitations forcing you to simplify your vision.
3. All-in-One Power: Recording and Editing and AI tools
Most eLearning authoring tools are just that—authoring tools. If your storyboard calls for a software simulation or a video tutorial, you usually have to record it in separate software (like Camtasia or OBS), edit it, and then import it.
- The ActivePresenter Advantage: It is an all-in-one powerhouse. You can record your screen, edit the video with a full timeline editor (cut, crop, speed up, green screen), and add interactive layers on top of that video—all within the same project. This USP eliminates the need to buy and learn multiple software packages.
4. Smart Exporting
Whether your client uses Moodle, Blackboard, or a corporate LMS, ActivePresenter ensures compatibility. It exports to SCORM 1.2, SCORM 2004, xAPI (Tin Can), and HTML5, ensuring that the tracking and grading outlined in your storyboard works perfectly in the real world.
Also, if you wish to publish your projects directly to an LMS, you can now perform this action right inside the application. ActivePresenter 10 enables direct publishing to uPresenter LMS, an interactive eLearning platform.
Pro Tips for a Smooth Storyboarding Process
To wrap up, here are three “golden rules” to keep in mind as you refine your process:
- Visuals over Text: Avoid the “Wall of Text.” If your storyboard has three paragraphs of text for one slide, break it into three slides or turn it into a voiceover.
- Number Your IDs: Give every screen a unique ID (e.g., Mod1_Slide05). When you are building in ActivePresenter, matching these IDs ensures you don’t miss a screen or link to the wrong page.
- Review on the Device: Before signing off on a storyboard, imagine viewing it on a phone. If the text seems like it would be too small, note a requirement for “Responsive Design” so you can adjust the layout during development.
Conclusion
Creating an effective storyboard is the single most important step you can take to ensure the success of your eLearning project. It clarifies your thinking, aligns your team, and saves countless hours of frustration during development.
However, a storyboard is only a plan. To turn that plan into reality, you need a tool that is versatile, powerful, and intuitive.
Don’t let your great ideas stay on paper.
If you are looking for a tool that offers professional features—from interactive quizzes to high-definition video editing—without the enterprise price tag, ActivePresenter is your best choice. It offers a powerful free edition that allows you to test all features without time limits.
[Download ActivePresenter Today] and start turning your storyboards into engaging learning experiences.

Leave a comment