The landscape of education has transformed irreversibly. As we navigate through 2026, the shift towards hybrid learning, microlearning, and flipped classrooms is no longer a future trend, it is the everyday reality for educators worldwide. In this digital-first environment, your ability to transfer knowledge effectively relies heavily on the digital tools you choose. At the heart of this toolkit is screen video capture software.
However, a major pain point persists: teachers and instructional designers are spending countless hours wrestling with overly complex platforms, or conversely, finding themselves severely limited by rudimentary tools that offer nothing more than a basic recording button. You need a solution that bridges the gap between high-quality recording and pedagogical effectiveness.
In this comprehensive guide, I will draw upon a decade of eLearning experience to break down exactly what makes a tool effective for education. We will explore the top three choices on the market, helping you find the perfect screen video capture software to elevate your teaching, engage your students, and save you precious time.
Full Disclosure: I am currently a Marketing Executive at Atomi Systems, the parent company of ActivePresenter. While this article is based on my decade of experience in the eLearning industry and reflects my honest professional assessment, please note my direct affiliation with the product.
Here is the table of content to help you save your time:
- What Makes a Great Screen Video Capture Software for Educators?
- Top 3 Best Screen Video Capture Software for Educators in 2026
- Step-by-Step Guide: How to Create an Engaging eLearning Video with ActivePresenter
- Frequently Asked Questions (FAQs)
- Conclusion
What Makes a Great Screen Video Capture Software for Educators?
Before diving into the top contenders, we must establish the criteria. The needs of an educator are fundamentally different from those of a Twitch streamer or a casual vlogger. A gamer might prioritize high frame rates for fast-paced action, while a teacher needs crystal-clear text rendering, the ability to pause and annotate, and mechanisms to check student understanding.
When evaluating screen video capture software for educational purposes in 2026, you should look for four core pillars:
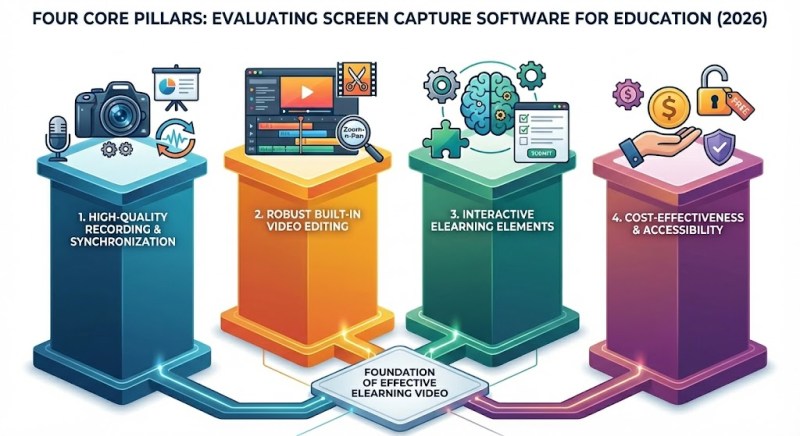
1. High-Quality Recording and Synchronization
A standard educational video often requires you to record your screen (showing a presentation, software, or document) while simultaneously capturing your webcam and audio. The software must sync these elements flawlessly. Desync issues, i.e., where your lips move seconds before the audio is heard, are highly distracting for learners and diminish the professional feel of your course. Furthermore, the ability to capture specific regions of the screen, rather than just the entire desktop, is vital for maintaining a clean, focused visual experience.
2. Robust Built-in Video Editing
Recording is only step one. A raw recording is rarely ready for student consumption. You will make mistakes, you will need to pause to clear your throat, and you will want to emphasize certain points. A top-tier tool must include a multi-track timeline editor. You need to be able to effortlessly cut out dead air, splice clips together, add zoom-n-pan effects to highlight small text, and overlay text annotations or shapes to guide the learner’s eye. If your software forces you to export the video and use a separate editing program, your workflow is already broken.
3. Interactive eLearning Elements
This is where standard video recorders fail and true eLearning authoring tools shine. Passive video consumption leads to high drop-off rates. To truly engage students, your screen video capture software should allow you to embed interactive elements directly into the video timeline. Imagine a video that pauses automatically, presenting the student with a multiple-choice question to verify their understanding before allowing them to proceed. This level of interactivity, combined with the ability to export in standard eLearning formats (like SCORM or xAPI) for your Learning Management System (LMS), is a game-changer.
4. Cost-Effectiveness and Accessibility
Budget constraints are a reality in the education sector. Many teachers are searching for a free screen recorder no watermark to get started without financial risk. While premium tools offer advanced features, the ideal software should offer a generous free version or an educational discount that provides immense value without forcing intrusive watermarks onto your standard video outputs.
Top 3 Best Screen Video Capture Software for Educators in 2026
Based on extensive testing and years of instructional design experience, here is the in-depth analysis of the top three platforms dominating the educational space this year.
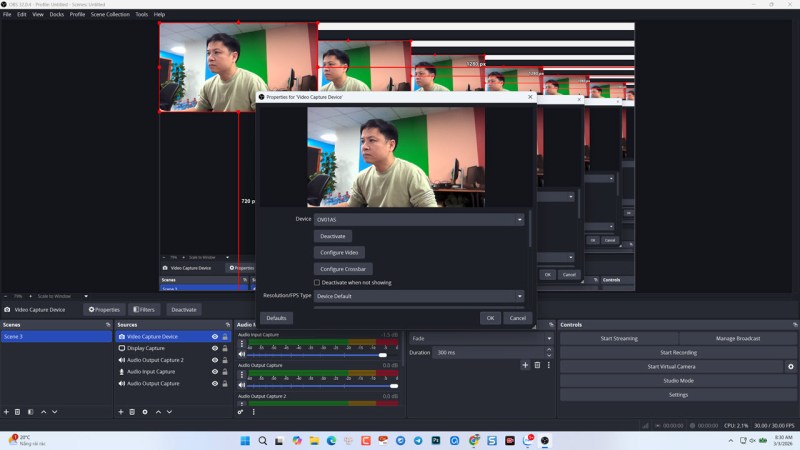
1. OBS Studio: The Open-Source Giant for Live Streaming
Overview: Open Broadcaster Software (OBS) Studio is the undisputed king of open-source video recording and live streaming. It is entirely free, community-driven, and incredibly powerful when it comes to capturing multiple sources at once. Most people, including me, starts their teaching career from OBS Studio. All in all, this is a good screen video capturing tool for multi platforms. The only downside of OBS Studio is that it’s not packed with built-in video editor.
Detailed review of OBS Studio is here!
The Pros for Educators:
- Truly Free: If you are specifically hunting for a free screen recorder with no watermark, OBS Studio delivers. There are no hidden fees, no trial periods, and absolutely no watermarks stamped on your final render.
- Scene Composition: OBS allows you to set up complex “scenes” (e.g., Scene 1: Full Webcam; Scene 2: Screen + small webcam in the corner) and switch between them smoothly during a live recording.
- Hardware Efficiency: It is highly optimized and runs surprisingly well on older machines, which is a massive plus for schools with aging hardware.
The Cons for Educators:
- Zero Editing Capabilities: This is its biggest downfall for eLearning. OBS is a broadcaster, not an editor. Once you stop recording, you are left with a raw MP4 file. If you sneezed halfway through, you must use a completely different software to edit it out.
- Steep Learning Curve: The interface is built for technical users and streamers. Setting up audio routing, bitrates, and canvas resolutions can be incredibly overwhelming for a teacher who simply wants to record a PowerPoint slide.
- No Interactivity: It offers zero eLearning features. You cannot add quizzes, SCORM compliance, or interactive buttons.
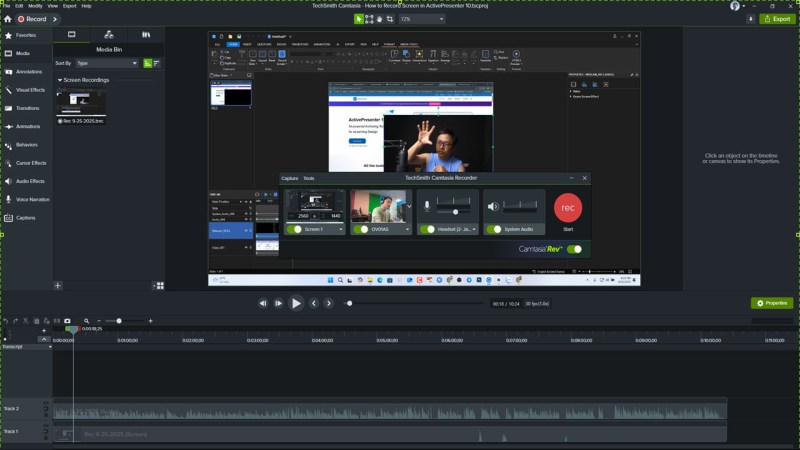
2. Camtasia: The Premium Standard for Video Editing
Overview: Created by TechSmith, Camtasia has been a staple in the corporate training and educational tutorial space for years. It is designed to be a premium, user-friendly combination of a screen recorder and a video editor. Camtasia has been the industry standard for years. Its screen recorder is no doubt one of the best options on the market. You can capture almost anything with Camtasia screen recorder. Your file will be saved in different layers and editable in the video editor. The only downside of Camtasia, in my opinion, is the price tag which is around $179/ year. It’s not a good deal for teachers.
Detailed review of Camtasia is here!
The Pros for Educators:
- Intuitive Interface: Camtasia’s drag-and-drop interface is highly polished. A beginner can learn the basics of the timeline editor within an hour.
- Rich Asset Library: It comes packed with royalty-free music, stylish lower-thirds, intro animations, and customizable icons that make your videos look highly professional with minimal effort.
- Excellent Cursor Effects: For software tutorials, Camtasia excels at smoothing out mouse movements, adding highlight halos around the cursor, and generating visual clicks.
The Cons for Educators:
- High Price Point: Camtasia is quite expensive. While they offer educational pricing, the initial cost and the cost of upgrading to new yearly versions can be prohibitive for individual teachers or underfunded departments.
- Resource Heavy: The software requires a relatively modern and powerful computer, especially when rendering longer videos or using complex transitions.
- Limited Interactivity: While Camtasia does offer basic quizzing, its capabilities as a full-fledged eLearning authoring tool are limited compared to dedicated platforms. Its SCORM reporting is basic, and it lacks advanced interactive scenarios.
3. ActivePresenter: The Ultimate All-in-One eLearning Powerhouse
Overview: If you want to move beyond simple video recording and step into the realm of professional eLearning, ActivePresenter is the definitive choice for 2026. Developed by Atomi Systems, it is not just a screen video capture software; it is a comprehensive eLearning authoring tool designed to create highly interactive, SCORM-compliant courses. For educators who want to truly elevate their digital classrooms, ActivePresenter stands head and shoulders above the rest.
Detailed review of ActivePresenter is here!
The Pros for Educators:
- Seamless All-in-One Workflow: Unlike OBS (which requires a separate editor) or basic recorders, ActivePresenter allows you to record, edit, and design interactions in a single interface. You can record your screen, edit the audio/video on a multi-track timeline, and add quizzes without ever switching software.
- Unmatched Educational Interactivity: This is the key differentiator. You can build branching scenarios, drag-and-drop interactions, and various question types (True/False, Multiple Choice, etc.). It exports seamlessly to SCORM and xAPI, allowing your LMS to track student progress flawlessly.
- Generous Free Version: ActivePresenter offers the best free value on the market. For standard video creation (recording, editing, exporting to MP4/AVI), it functions as a free screen recorder with no watermark and no time limits.
The Cons for Educators:
- Steeper Learning Curve: Because it is a professional authoring tool with features similar to PowerPoint combined with a video editor, the interface can be overwhelming for absolute beginners who only want a “one-click” recording solution.
- Watermark on Interactive Exports: While standard video exports (MP4) are watermark-free, if you use the advanced interactive features and export to HTML5 (for LMS upload) using the Free edition, a watermark will be applied. You need a license to remove it for interactive content.
- Desktop Only: Currently, ActivePresenter is a powerful desktop application (Windows/macOS). It does not have a web-based version or a mobile app for quick, on-the-go recording like some lighter tools.
Step-by-Step Guide: How to Create an Engaging eLearning Video with ActivePresenter
To demonstrate the power of a proper workflow, let’s walk through the exact steps of creating a high-impact, interactive lesson using ActivePresenter. If you want to watch video tutorial, take a look at my tutorial on YouTube:
These steps are easy!
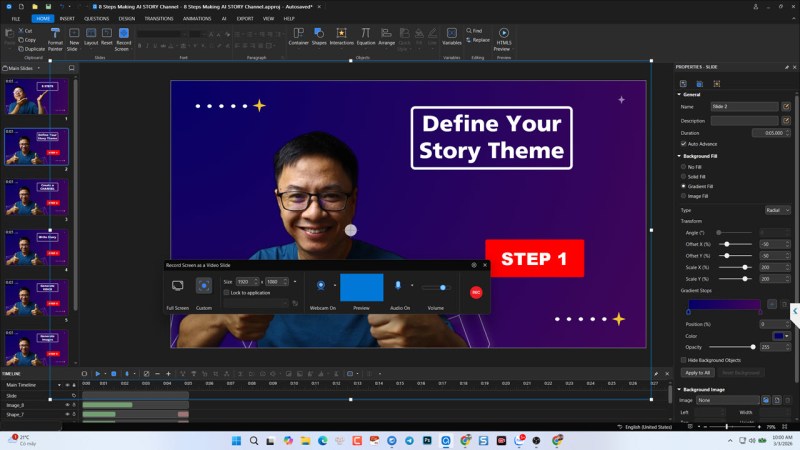
Step 1: Planning and Setup
Before hitting record, preparation is key.
- Open ActivePresenter: Launch the software and click on Record Screen as Video.
- Select your Area: You can choose to record the Full Screen or a Custom Area. For tutorials, recording a specific application window (Custom Area) often yields a cleaner result, hiding your cluttered desktop background.
- Audio & Webcam: Toggle your Webcam on. Select your primary microphone. Pro Tip: Always do a 10-second test recording to ensure your audio levels are bouncing in the green zone to avoid distorted sound.
Step 2: Capturing the Screen
- Click the red REC button. A 3-second countdown will begin.
- Deliver your lesson. Speak naturally.
- The Golden Rule of Recording: If you make a mistake, do not stop the recording. Simply pause your speech, take a breath, smile, and repeat the sentence. You will easily cut the mistake out in the next step.
- When finished, press CTRL + END (Windows) to stop the recording. ActivePresenter will immediately transport your recording into the editing workspace.
Step 3: Editing Like a Pro
You are now looking at the timeline. You will see your video track, system audio track, and microphone audio track.
- Cutting Mistakes: Play through the timeline. When you find that mistake you made, simply click and drag the playhead markers to highlight the bad section, and click the Delete icon. The software automatically ripples the remaining footage together seamlessly.
- Guiding the Eye (Zoom-n-Pan): If you are showing a complex software interface, your students might not see where you are clicking. Go to the Insert tab, select Zoom-n-Pan, and draw a box over the specific menu you are talking about. The video will smoothly zoom into that area, holding the learner’s attention.
- Adding Annotations: Use the Shapes and Text Box tools to add lower-thirds (your name and title) or to point arrows at key concepts on your slides.
Step 4: Adding Interactivity (The Game Changer)
Let’s ensure the students are actually paying attention. We will add a pop quiz right in the middle of the video.
- Move your playhead to the 3-minute mark where you just explained a core concept.
- Go to the Questions tab and select Multiple Choice.
- A new slide is inserted. Type your question: “What is the primary benefit of microlearning?” and input the answer choices. Set the correct answer.
- By default, the video will now pause at the 3-minute mark, force the student to answer the question, and provide instant feedback (“Correct!” or “Incorrect, try again”) before the video resumes.
Step 5: Exporting Your Course
Your interactive masterpiece is ready.
- Go to the Export tab.
- If you just want a standard video for YouTube or Google Drive, select Video (MP4).
- If you want to utilize the interactive quiz we just built and upload it to your school’s LMS (like Moodle, Canvas, or Blackboard), select SCORM or xAPI. ActivePresenter will package your entire lesson into a neat ZIP file that communicates directly with your grading system.
Frequently Asked Questions (FAQs)
Q1: Do I need a powerful, expensive computer to run screen video capture software? Not necessarily. While high-end editing features render faster on powerful machines, tools like OBS and ActivePresenter are highly optimized. For standard screen recording and basic editing in ActivePresenter, a mid-range laptop (e.g., Intel Core i5, 8GB RAM) from the last five years is more than sufficient.
Q2: What is the best free screen recorder no watermark for teachers who are on a strict budget? If you only need to record and live stream without editing, OBS Studio is fantastic. However, if you need to record and edit your videos, the free version of ActivePresenter is the undisputed champion. It allows unlimited recording time and full access to standard video editing tools without adding a watermark to your MP4 exports.
Q3: I already have hundreds of PowerPoint presentations. Can I convert them into interactive videos? Absolutely. One of the strongest features of professional eLearning tools, specifically ActivePresenter, is the ability to directly import PowerPoint (.pptx) files. It retains your slides, text, and even animations. From there, you can record a voiceover for each slide, add your webcam, insert interactive quizzes between the slides, and export the entire package as an interactive HTML5 course.
Conclusion
Finding the right screen video capture software does not have to be a frustrating process of trial and error. While OBS Studio offers great open-source broadcasting and Camtasia provides a premium, albeit expensive, editing experience, the needs of educators in 2026 demand something more specialized.
You need a tool that respects your time, fits your budget, and ultimately creates a better learning environment for your students. With its all-in-one recording and editing capabilities, deep interactive features, and an incredibly generous free version, ActivePresenter stands out as the most powerful and practical solution for teachers and instructional designers today.

Leave a comment