Movavi screen recorder review: a powerful, lightweight screen recorder for video streaming, webinar recording and video calls.

Our review
Movavi screen recorder is one of the most simple to use software for recording desktop computer to create high quality raw footage and transform it into interactive tutorial videos with a user friendly interface and simple editing features.
Pros
- Simple to use, intuitive user interface.
- Being optimized for recording video and audio for streaming, webinar and video calls.
- Record full screen, customized area or specific Windows or application.
- Built-in basic video editing tools.
- Adding effects, transitions and captions to recorded videos.
- Advanced editing tools: Chroma key, video stabilization and slow motion are available in this software.
- Cut out unwanted parts from any video
- Save recordings to watch on a computer or mobile device
- Replay captured videos at any time
- Capture short clips from websites
- Save movies and TV series
- Record video chats with your friends and family
- Extract music from video, record online radio
- Cut out ads and other unwanted content
- Support multiple languages.
- Small size to download.
- Customized hotkey.
- Record mouse cursor, keystroke.
- Scheduling recording time.
- Save videos into MP4, AVI, GIF or MP3.
Cons
- Trial period is only 7 days.
- Watermark on recorded video.
- Recording limitation at 120 second in trial verson.
- Lacking of drawing tools.
Platform: Windows, Mac
Download size: ~49.2 MB.
Try Movavi Screen Recorder for Windows here
Try Movavi screen recorder for Mac here
Latest Version: 9.0 Released: August 11th
Our Reviewed date: October 18th 2017
Rating: 8/10.
Category: Screen Recorder
We have to admit that Movavi screen recorder is absolutely a good choice for users who need a simple to use, professional recording software for daily work.
How to record screen with Movavi Screen Recorder
This is a short tutorial for you to learn how easy it is to record screen with Movavi Screen Recorder.
1. Install the Screen Recorder for Windows or Mac
Open the file you’ve downloaded to launch the setup program. Movavi Screen Recorder will run automatically after the quick installation. You will see the interface similar to the picture at the beginning of this article.
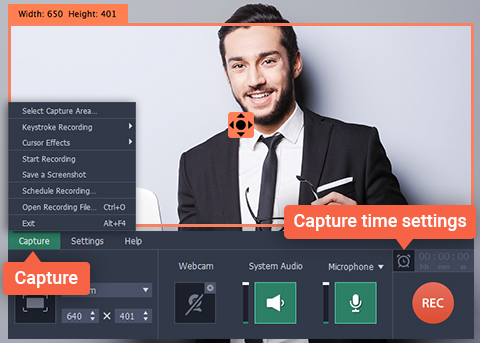
2. Set the Capture Parameters
Start by selecting the capture area: place the cursor over the application window you are going to capture and click the left mouse button. You can also draw the capture frame over the target part of your screen by holding the left mouse button and dragging the cursor across the screen. After doing this, you’ll also be able to pick a size preset from the Capture Arealist in the program interface. Now choose the type of audio device you’ll be using for capturing sounds by clicking the appropriate icon(s) – speaker and/or microphone – in the middle of the window. Make sure the icon you want is green. Both inputs can be used simultaneously or individually.
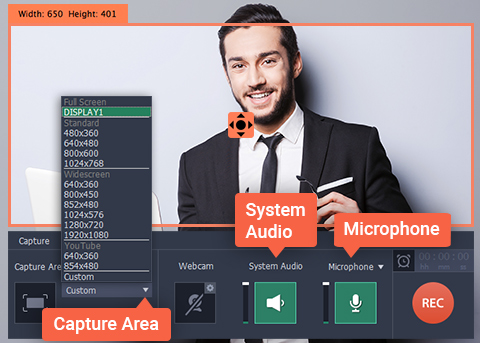
You can also choose to highlight the mouse cursor or show keyboard actions; to do this, expand the Capture menu and select Keystroke Recording or Cursor Effects to configure these options. If you want to specify the duration of the capture process, click the alarm clock icon above the REC button and set the capture timer.
3. Record Your Desktop Video
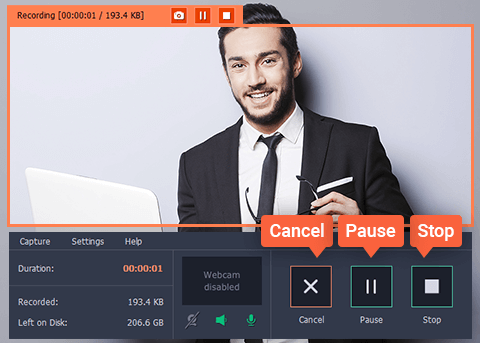
Click REC or press F10 to start capturing your video. To finish, use Stop or F10. If necessary, click Pauseor press F9 to take a break. Click Cancel if you want to stop recording without saving. To take a screenshot, press F8. The video you captured will be automatically saved in MKV format and open in a preview window.
4. Edit and Convert Your Video (Optional)
In the preview window, you can trim off unwanted footage from the recorded video. To do this, drag the marker to the starting point of the unwanted segment and cut it off with the scissors tool, then mark the ending of that segment in the same way. Left-click on it and press the trash can to remove the segment from your video. To save any changes you’ve made and convert the screen video to a different format click the Save As button in the bottom right corner of the interface.
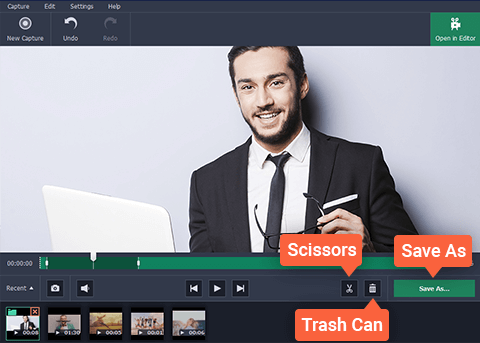
In the export dialog that opens, select the format you want. The last step is to click Save, then sit back and enjoy the results.

Use Movavi Screen Recorder as a fast and reliable tool to record screens in Windows 7, Windows 8, Windows 10 and Mac and capture cam chats, sounds, images and anything you like with ease!
How to record Skype Calls in Movavi
How to capture video from YouTube and other Website by Movavi
Publisher’s description
Movavi Screen Recorder:the Ultimate Screen Recorder for Windows
Movavi Screen Recorder is lightweight yet powerful video recording software that helps you capture streaming video and music from websites, save Skype calls and program activity, and much more.
Learning
- Record webinars, online tutorials, and other educational videos
- Cut out unwanted parts from any video
- Save recordings to watch on a computer or mobile device
- Replay captured videos at any time
Fun
- Capture short clips from websites
- Save movies and TV series
- Record video chats with your friends and family
- Extract music from video, record online radio
- Cut out ads and other unwanted content
Work
- Show screen activities to colleagues: take screenshots in a single click and illustrate them with arrows, frames, and captions
- Use screenshots and screen videos to demonstrate bugs and errors
- Save Skype conversations with colleagues and business partners
- Record online job interviews
Formats
| Video Formats | Supported Codecs |
|---|---|
| 3GPP (.3gp), 3GPP2 (.3g2) | H.263, H.264, MPEG-4 |
| Audio Video Interleave (.avi) | H.264, MPEG-4, MJPEG |
| Flash (.flv, .swf) | FLV1, H.264 |
| Matroska (.mkv) | H.264, MPEG-4, MJPEG, Theora, VP9 |
| MPEG-4 (.mp4) | MPEG-4, H.264 |
| OGV – Ogg Video (.ogv) | Theora |
| QuickTime (.mov) | H.264, MPEG-4, MJPEG |
| WebM (.webm) | VP8, VP9 |
| WMV – Windows Media Video (.wmv) | WMV V8 |
| Audio Formats | Supported Codecs |
| AAC – Advanced Audio Coding (.aac) | AAC |
| FLAC – Free Lossless Audio Codec (.flac) | FLAC |
| MP3 – MPEG-1/2 Audio Layer III (.mp3) | MP3 |
| OGG – Ogg Audio (.ogg) | Vorbis |
| WAV – Waveform Audio File Format (.wav) | PCM |
| WMA – Windows Media Audio (.wma) | WMA 9 |
| Image Formats | |
| BMP (.bmp), DPX (.dpx), JPEG (.jpg, .jpeg, .jpe, .jfif, .jif), PBM (.pbm), PCX (.pcx), PGM (.pgm, .pnm), PNG (.png), PPM (.ppm), TGA (.tga), TIFF (.tiff, .tif), XBM (.xbm) |
|
Bottom line
If you are looking for a professional screen recorder for making tutorial video, product demonstration or recording Skype Calls, Webinar then Movavi screen recorder is a great choice. The price you need to pay after trial period is also very competitive: $39 for personal and $59.95 for business.

Leave a comment