Learn how to record screen for YouTube videos here. The best free software that help you record your computer’s screen to add into YouTube videos.
Recording screen for YouTube videos – Why would you want to do?
Recording computer screen to create video and upload to YouTube is the most common way to share your knowledge and experiences nowadays. You can monetize your video by allowing pop-up advertisements appear on your videos too.
The best way is using a screen recorder to record your computer screen with audio, cut, trim unwanted parts of the video, annotate it with shapes, highlights, texts and share it. The other way is using your cam recorder or smartphone to shoot a video, edit it and upload to YouTube. By any way, a powerful screen recorder like ActivePresenter can help you.
ActivePresenter is not only a screen recorder but also a professional video editor for recording screen with audio and edit it to make tutorials or product demonstrations at no cost. It is free for non-commercial use and can work on both Windows & Mac.
In today post, I am going to show you how to record screen for YouTube videos with ActivePresenter. At first, you’ll need to download and install ActivePresenter on your computer. Follow below link to download it.
Take a look at this demo video to know more about ActivePresenter.
Once the download is finished, click the file to install it. Remember that ActivePresenter will not ask you to install any third party program as well as no addition ads in the package. It is free from virus and malware too. A shortcut of the program will appear on your desktop. Click it to start recording your screen.
How to record screen for YouTube video with ActivePresenter
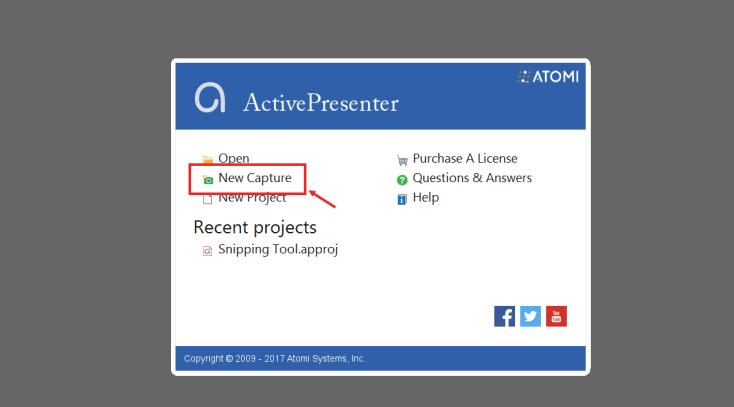
After launching the app, you’ll see the interface like below picture. Click New Capture if you want to record screen only. There are some options to choose after you click New Capture. The option I often use is Record full motion for demonstration with highest quality.
Before choosing an option to record screen, you can type your video name and choose a location to save it on the interface.
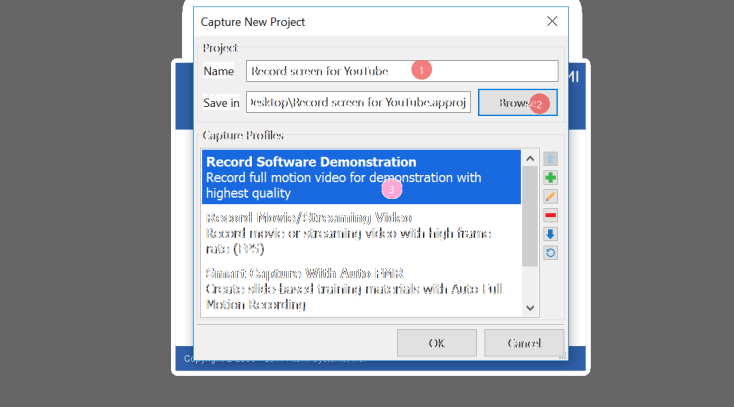
Click OK to go to recording tools.
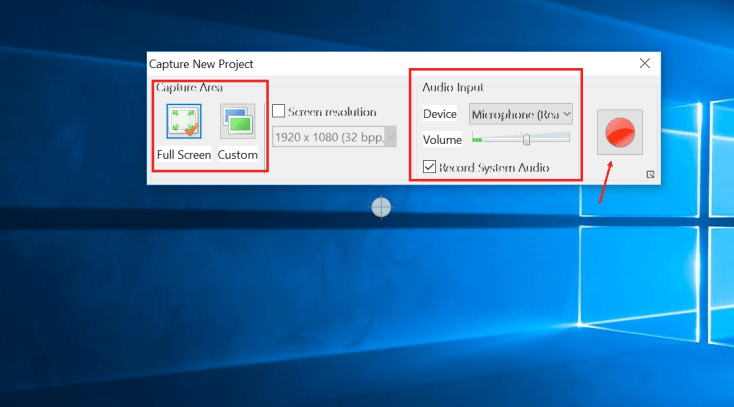
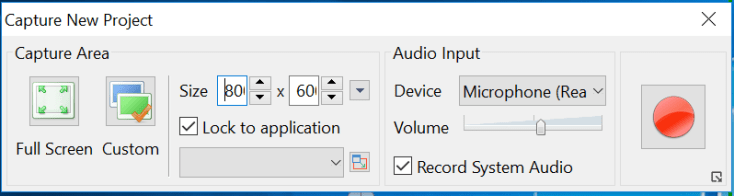
As you can see on the picture, you are able to record Full screen, custom resolution with highest quality 1920 x 1080 (32bpp). By choosing this resolution, you can create full hd quality footage. There few features you’ll need to check i.e check if you want to record screen with audio or without. Check the box if you want to record system sound. If you turn into record custom resolution, you are able to choose Lock Application which means you can choose to record a window, a web browser of a running program on your computer.
 Before clicking red button on the right to start recording your video, be sure that you look at the settings of the program. To access settings menu, click its small icon at the right corner of the recording tool bar. In this menu, you can set up your video codec, audio, annotation, cursor and hotkeys. If you don’t want to change, choose default setting to go.


Now to you can go. Click the red button on the tool bar to start recording screen. If you want to make a tutorial video to upload to YouTube, I advise you to choose full screen recording option because it can show everything you to on the screen and make sure that your viewers don’t miss any of your action.
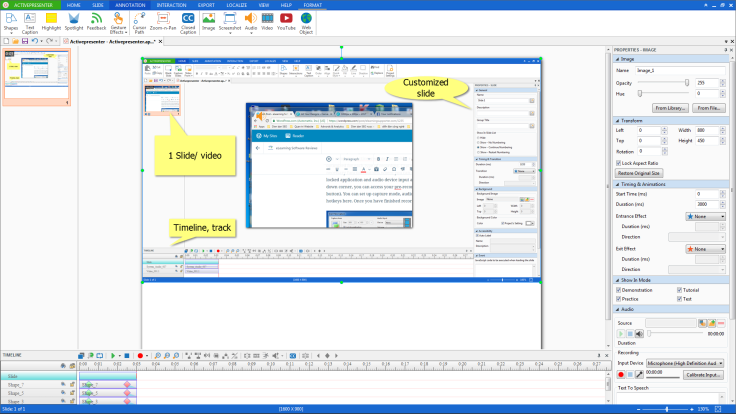
Press CTRL + End to stop the recording. This is the default hotkey to stop recording in ActivePresenter. The other way is to find the floating tool bar and clik on stop icon. Once you stop, the program will direct to their video editor for editing your video such as: cut, trim unwanted part, add annotation, text, close caption, highlight, sport light as well as join, merge multiple video and many more. If you want to find out how to use ActivePresenter, take a look at these tutorial videos from my previous post. By the way, the interface of ActivePresenter video editor is easy to navigate and use. You’ll not get lost, I am 100% sure. Take a look at below picture.
Exporting video to finish the job
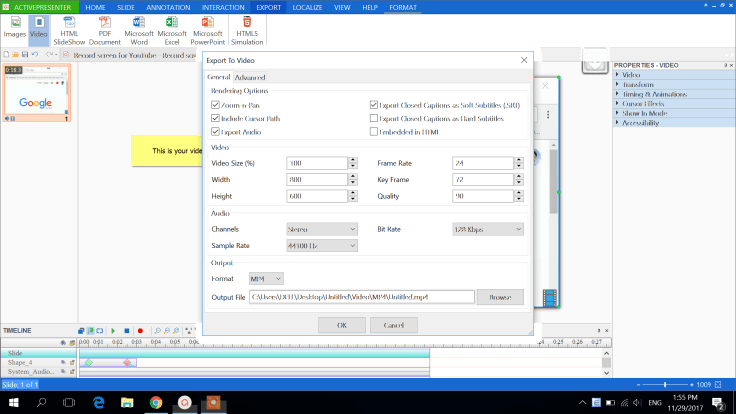
In order to upload your video to YouTube, you’ll need to create a video in MP4 or AVI which are fully supported in ActivePresenter. Once you finish editing, you need to rend it to the above mentioned video formats. I would advise you to choose MP4 to get a small size video with highest quality for uploading. There are few more things to check when exporting video in ActivePresenter. For example: choose video size percentage, Frame rate, Key Frame. Be sure to check all the boxes to export such as: Zoom-n-Pan, Include Cursor path, Export audio, Export Closed Caption and so on.
That’s done! You have just followed my step by step guide on how to record screen to upload to YouTube (for free). All you need to do now is to login into your YouTube Account and start uploading it to your channel. I guess you know how to upload your video to YouTube, right? It is easier than eating cake. Here are some tips to get higher rank on YouTube when uploading video to your channel:
- Upload video that is shorter than 5 minutes can attract more viewers than longer one.
- Describe carefully your video in the description to optimize for search engine.
- Create an attractive title for your video to drive more traffic to it.
These are just some simple tips I often use.
Okay! If you still don’t know how to record screen and uploading it to YouTube, take a look at this video to learn how!
How To Record Screen In ActivePresenter for YouTube
Bottom line
Life is not always easy! There’s no free meal! If you want to create a tutorial video or product demonstration video to upload to YouTube for non-commercial only, you can use ActivePresenter. But, if you want to earn money from your video legally, you should buy it. Don’t forget to follow us to receive more valuable post notifications in the future.
Good luck!

